You’ve built up your email list, you know how to compose emails that convert, now it’s time to make it all more efficient with email marketing automation!
Think about it, you could sit at your computer all day composing countless emails attempting to bring your potential customers along through your conversion funnel in a seemingly never ending process, OR you could map out a structure that you follow each time and simply create an automated email flow that will do the work for you!
There are all kinds of things you can automate, from your welcome flow to your shopping cart abandonment flow.
In this post we will explore how to actually create an automated email workflow, and we’ll take a look at a few sample workflows to get you going.
Why Email Marketing Automation is Important
Before we get into how to build a workflow, first we need to establish why it’s so important to use email automation (aside, obviously, for the ease).
According to a study by Silverpop, automated email campaigns have a 15% higher open rate than regular emails and 79% higher click through rates!
Additionally, by creating workflows, A/B testing them, and always improving them you can create a highly optimized machine that will work for you to continually boost your sales and build your business.
How to Build an Email Marketing Workflow
Now that you understand the importance and significance of email marketing automation, let’s discuss how to go about creating an automated workflow.
Step 1: Set Your Goals
The first thing you should do when planning out a workflow is determine your goals. What do you want this series of emails to accomplish for you? There is no purpose in creating a workflow if you don’t know what you’re trying to achieve.
There are any number of goals you could be shooting for – sales, returning customers, building trust, generating excitement, and more.
Step 2: Plan Out How You Will Reach Your Goal
Once you have your goal set, the next thing to do is to figure out how you will get to that goal. Within this step there are a few things you will need to actually do:
First, you should think about each email workflow like a mini sales funnel. You want to bring your users from awareness to interest to desire to action.
Obviously there will be some differences in each workflow depending on your goal, but this is the general formula you should follow.
To accomplish this you can use a mixture of useful information, reviews, blog posts, coupons, and whatever else you have at your disposal.
Next, keep in mind that you will not have 100% success in guiding your users through the funnel, so you should have a plan in place for every possible scenario that your users could present to you.
For example, if you send out an email as part of a welcome series inviting your readers to sign up for your blog, some will sign up and some will not. Obviously you’re not going to send the same email to the people who do sign up as you would to the people who don’t.
You can set different emails as responses, resend emails, or even transfer people into different workflows. No matter what you do, make sure that while mapping out your workflows you take into account all possible contingencies.
Finally, determine the amount of time that will pass between each email that is sent out. The best way of doing this is by putting yourself in the customer’s shoes and thinking about how you would react when receiving the email.
This is a tough balance to find, because on the one hand you don’t want to bombard your customers, but on the other hand you don’t want to lose the flow of your correspondence.
Step 3: Write Your Emails
Now that your flow is planned out and all possible contingencies are accounted for you should write up your emails according to our Ten Email Marketing Tips and follow our Tips to Boost your Open Rates.
Step 4: Test Out and Tweak Your Emails
As with any other marketing scheme that you implement you should always test out the success of your email workflows. See what is working and what isn’t. Test out different designs, copy, or subject lines. By doing this you will be able to find the formula that works best for your business.
The other thing you should keep your eye on is if there are people that get lost in your workflows. It’s possible that your email copy is perfect, but you’re sending the wrong email at the wrong time. So keep an eye on which flows work best as a whole and try to optimize that as well.
Examples of Email Workflows for eCommerce
In order to help you to truly understand how a workflow works and how it can benefit your business, we wanted to give you a few examples of workflows that you can implement in your business today!
Welcome Workflow – A Detailed Example
The most classic email workflow is the welcome workflow. You can use this type of flow any time someone creates an account at your website – whether they made a purchase or not.
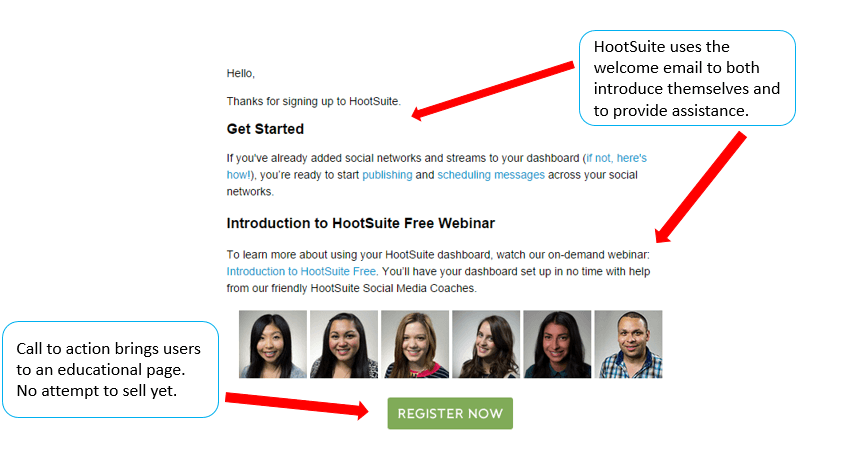
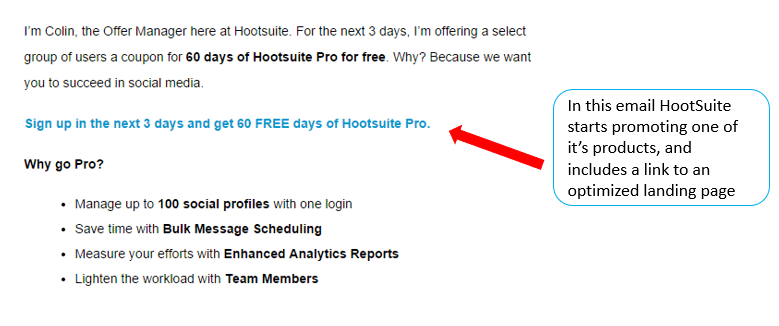
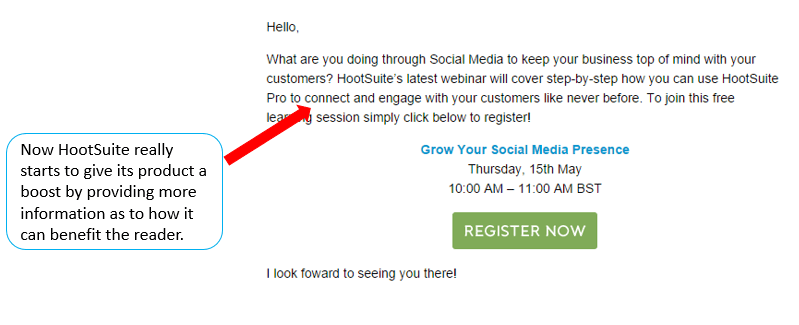
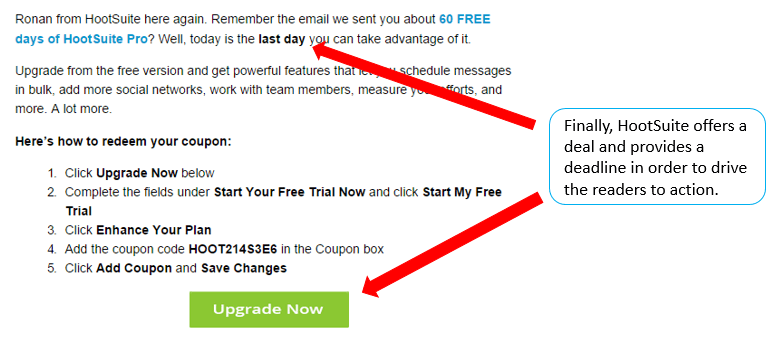
Let’s build this workflow together by following the steps mentioned above. As we go through the steps we will analyze the equivalent emails from HootSuite’s welcome flow:
Step 1: The goal of a welcome workflow generally speaking is to take someone who expressed interest in your products and gets them to make a purchase, with the idea that they will become a returning shopper.
Step 2: In order to get this person to move along the sales funnel you could create a flow like this:
Welcome email: This email should welcome the new member. Make it nice and friendly. You should include a bit of information about your company culture as well.
- Goal of the email: Educating your potential customers about your business by creating a sense of familiarity.
- Call to action of the email: Should be something simple like a link to your homepage, or to a page about your business (testimonials, press releases, etc.)
- Timing: Immediately after registration.
(HootSuite performed this email and the next one at the same time, so the example will be in the next section)
Assistance Email: In this email you can ask if your reader needs more information or assistance. This could be either related to your products or related to the broader culture of your business.
For example, if you sell cameras, this email could say something like “Do you need help choosing your next camera?” or, “Could you use some photo taking tips?”
You should also prominently display your customer support information.
- Goal of the email: Raising the level of familiarity between your customers and your business, while also educating them about the products in order to create trust.
- Call to action of the email: This should link to something educational like your blog or one or two introductory level articles.
- Timing: 3-7 days after the initial email.
Products Email: Now it’s time to start sending some information about your actual products. In this email you can say something like, “Check out our newest collection of ______.”
- Goal of the email: Moving your customers along the funnel from awareness to interest in your products.
- Call to action of the email: You should send your readers to an optimized landing page with some of your highest selling products in order to draw in your potential customers.
- Timing: Give your users some time. This should be sent about two weeks to a month after the last email.
Product Booster: In this next email you are going to want to make your products sound very appealing. You can use some great reviews, press mentions, case studies, free trials, or whatever else you can think of to make your products look great!
- Goal of the email: Moving your customers from interest to desire by showing how good your products are.
- Call to action of the email: You can send your users to any number of places. One option is to keep things on your site by sending them to an optimized landing page dedicated to a specific product or line of products that displays benefits and shows real testimonials. Another option would be to go off-site and send your readers to a recent article or review about your products.
- Timing: 3-6 weeks after the previous email.
Coupon Offer: Finally, you are trying to really push the sale by sending a coupon. In this email you can send a “limited time offer” to your readers.
- Goal of the email: Get your readers to make a purchase
- Call to action of the email: Keep it simple – “Get this coupon now!” “Offer ends today.” Anything that creates a sense of urgency and encourages immediate action.
- Timing: A few weeks after the last email.
At this point, the idea is that you will have given your potential customer all the reasons in the world to make a purchase, and to make it specifically from you.
As mentioned earlier though, it is very likely that your readers won’t follow the flow exactly as you expect them to. In order to best display this concept, we’re going to need to really map out the options.
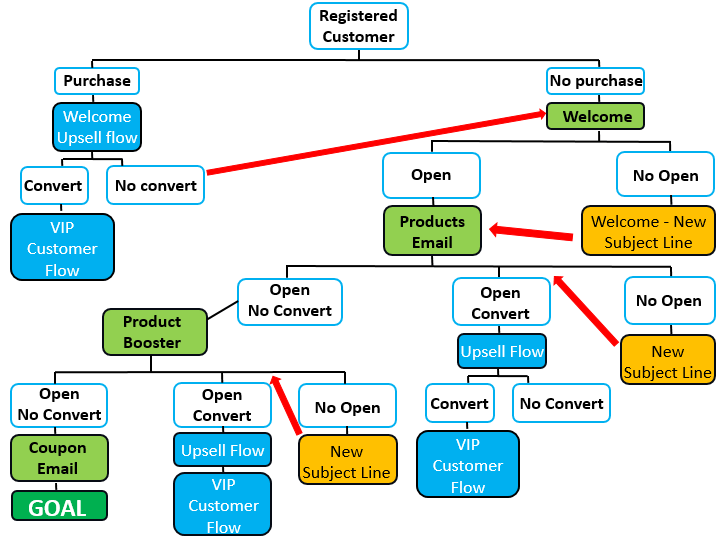
Here is a sample map of the above flow including potential consumer actions and responses to the different actions:
Notice how built into the welcome flow map are any number of new flows that customers can be transferred to depending on how they interact with the emails. You can also resend the same email if it received no interaction, but you might want to change the subject line so it isn’t an exact duplicate.
These maps (as you can see) can become quite complicated, but they are very important! Only by mapping out all possibilities will your automation become truly effective and personalized.
Now that you have a more detailed understanding of how to put together a workflow we’re going to give you a few more (less detailed) examples of common workflows that you can use to boost your sales.
Cart Abandonment Workflow
Cart abandonment is a problem that plagues all eCommerce stores, so why not be ready with a workflow just for it?
The goal of this flow is to make a sale
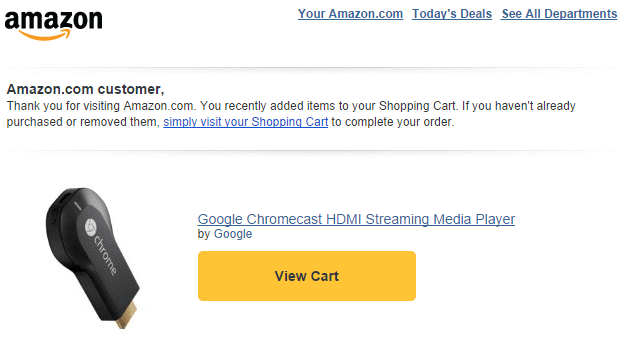
1. Awareness: Send an email as a reminder prompting the customer to complete the purchase. For example, I received this email from Amazon:
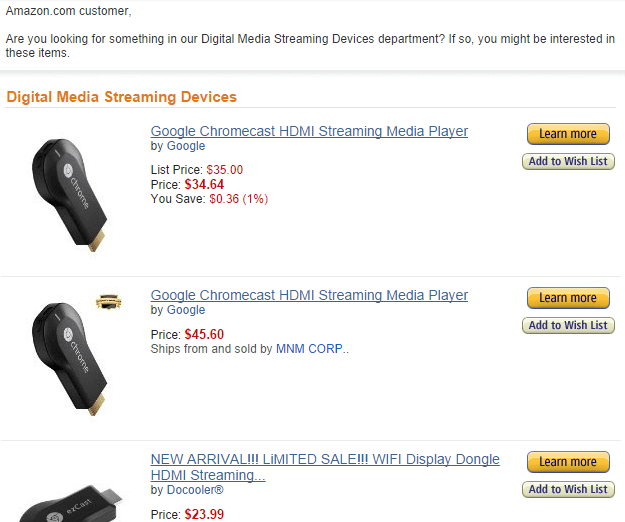
2. Awareness II/Interest: If that prompt wasn’t enough you can send another email with similar items as a secondary prompt. You can add in something like, check out our top selling _____ (relevant to the department your customer was interested in).
3. Desire: Send an email with some product reviews or testimonials – “Look at what the New York Times has to say about our _____.”
4. Action: Send a coupon.
Purchase Workflow
Obviously you should engage with your customers after they complete a purchase. Creating a workflow can take this process from simply being a thank you letter, to creating an upsell opportunity.
The goal of this flow is an upsell
1. Awareness: Start by thanking your customer for their purchase. Then you can include related products by saying something like “Congratulations on your new ________, you should consider our _______ to enhance the experience.”
2. Interest/Desire: Send your customer useful information that will help them with their initial purchase – relevant blog posts, articles, and videos. In this content you should display how a related product could enhance the product which was purchased.
3. Action: Ask your customer to fill out a survey of some sort – how the purchasing process was for them, if they are satisfied with their purchase, etc. – and include a coupon for the products you are trying to upsell as an incentive to complete the survey.
VIP Customer Flow
Every store has its most active customers – those that purchase the most, leave the most reviews, or share the most content. You can create a workflow to target your most engaged customers!
The goal of this flow is to convert returning customers into super customers/brand advocates
1. Awareness: Thank your most highly engaged customers, and tell them that they have been selected to be part of a VIP list that will include all sorts of “exclusive information” and private deals.
2. Interest: Mention that you would like to put together an even more exclusive list of people who will get to try and review new products before they are released. Add an opt-in form for this in order to get the most engaged readers to join this list.
3. Desire: Send an email to those who opted-in welcoming them to the elite club, and then get them started by asking them to review an idea that you have for a new product, or to review an old product which they already purchased. You can include a coupon as an incentive as well.
4. Action: Thank your customers for their review, and explain that they will be receiving more new products at discounted rates to review, or coupons to review older products. You should then add in that they can receive further discounts by sharing their reviews on social media or elsewhere on the internet.
Just like that you can take a customer and turn them into a brand advocate.
Moving Forward
There are all kinds of email workflows that you can set in place for your business – re-engagement flows, event flows (birthdays etc.), blog engagement flows, and more!
If you don’t yet use workflows in your business you should definitely start slow. Begin by creating one or two flows, optimizing them, and getting them rolling before you start to create more flows. Otherwise you might not be able to track your flows as well as you should which will lead to inefficient email flows.
Once you have a few work flows down pat and you know what works for you, then it’s time to start expanding and creating more workflows.
That being said, I would still suggest mapping out all of the possibilities of flows and changes of direction in advance, and then filling them in with actual content as you move along.
If you’re looking to learn more about email marketing I would definitely suggest downloading our free Ultimate Guide to Email Marketing!

Zack is a social media enthusiast who loves all things digital. He is the inbound marketing manager at StoreYa where he spends his days searching for the newest social marketing scoop. If you’d like to chat with him, feel free to connect with him on any social platform.
Recommended articles
 Facebook Ads for eCommerce: 16 Strategies, Examples & Tips
 How to Build a Winning eCommerce Ads Strategy
 Google Ads for eCommerce: Everything You Need to Know
 10X Your Traffic with PPC Management Software
Comments
Powered by Facebook Comments
