The secret to an online store’s success is making an excellent first impression, and nothing does that better than good-quality product photography.
When it comes to creating product listings for your online store, white background product photography can make a massive difference to your conversion rates.
- According to Shopify, “50% of online shoppers think that product photos are more important than product information, reviews, and ratings.”
And it doesn’t take an expert to figure out why: when shopping online, product photos are the only way a buyer gets a sense of what you’re selling. Product photography is vital to both on- and off-site marketing, as photos play a crucial role in your shoppers’ buying-decision process.

Not only are your product photos viewed on your site but also in your PPC channels, such as Google Ads for eCommerce, Facebook ads, Microsoft ads, and your social product ads and posts, including YouTube ads and other video marketing thumbnails.
Here’s what we will cover in this guide; feel free to jump ahead!
White Background Product Photography
But first, let’s talk about types of photography.
Best Types of Product Photography
There are two main types of product photography:
- In-context (or lifestyle photography)
- Product-only images
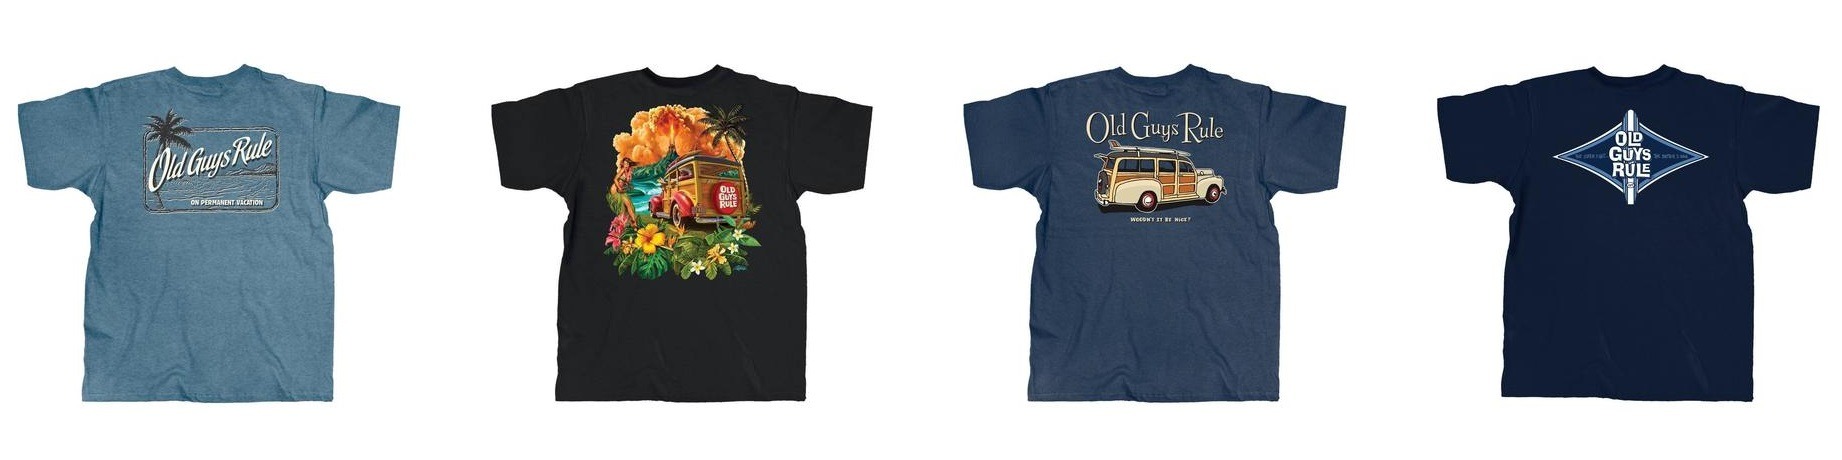
Here’s an example of each from one of our favorite merchants, Old Guys Rule.
Lifestyle product photos are product photos that show your products being used. Here are some examples of their lifestyle shots, the same types of photos you may use in your Instagram marketing.

Product-only photos are clean, white background photography photos of your product, as seen below.
Today we will be discussing product-only photos.
We will go through why white background product photography is key to upping your product photography game, and guide you through shooting and editing your own product photos like a pro.
So grab that coffee and get ready for your complete guide to creating product photos for ads and your store!
Why Use White Background Product Photography?
1. They Make Your Products Pop
The benefit of choosing one background color is store consistency, and white offers the most continuity and makes different color and style products look great. Plus, if you want to show your products with the fewest distractions, white backgrounds are the best way to do this.
2. They Offer More Versatility for All Marketing Channels
If you’re on a tight budget, you want to ensure that the product photos you shoot can be used in your marketing and eCommerce ads as well.
For example, with Google Shopping campaigns, your product photos can only have white, gray, or lightly colored backgrounds.
Pro Tip: Don’t forget to review and tweak your Product feeds before peak shopping days – including product images! This will help you boost sales during high search volume days. You can read more about optimizing your holiday campaigns here: Sales Promotion Examples and Holiday Shopping Google PPC Strategy for eCommerce Retailers. Also, be sure to use automation tools to run and optimize these campaigns on autopilot.
Or, if you decide to become a multi-channel seller and include Amazon as a marketplace, one of their image requirements is that backgrounds be pure white (RGB 255, 255, 255).
3. White Background Photos Are Easier to Edit
When it comes to shooting and editing your product photos yourself, white backgrounds tend to make it a lot easier for beginners to create awesome product photos.
4. It’s Easier to Upgrade from White Product Photos to Color
When you think product photography white background, you think boring.
But the truth is, even if you want to add a spot of color to your product photo by making your background neon yellow, you need to start with a good background that’s easy to edit.
The easiest color to work with in terms of product image editing and background removal is white. Here’s some tips on what background to change to and how to do it.
@storeya.com E-commerce Tip: if you product images are not matching and have different color backgrounds, it’s time to change that up. Here are some easy tools to help you level up product image game! #ecommercetips #entreprenuer #businesshack ♬ original sound – StoreYa.com
—
Now that we know why product photography on white backgrounds is the best choice for eCommerce product-only images, let’s get into creating photo guidelines, product photography must-have equipment, and how to shoot and edit your own product photos.
How to Create a Product Photography Guideline and Why You Need One
Before you get camera-happy, you need to come up with an action plan. In product photography terms, this is your photography guideline.
Why do we do this first?
Because the aim is to create a consistent look and feel for your eCommerce brand.
This will not only help with building a strong brand presence, but ensure you exude quality.
This guideline is dynamic, and you’ll work on it while you’re shooting your first photos, until you’ve finished editing them to your standard. The most important things to track and include in your guidelines are:
- Editing software and setting
- Lighting setup, product angles, and distances between your digital camera and your product
- General image saturation
- Overall color palettes
- Focal length
- Image dimension and size
- Ratio of white space around each product
Creating a guideline to follow will help ensure that all the photos you take will have a consistent feel and maintain a similar size and scale. It will also save you a lot of time as your number of new products increases.
What Basic Product Photography Equipment Should You Use?
The must-have tools for product photography on a white background are as follows:
1. White Background
Firstly, if you are not using a lightbox (see below), you will need to create a plain white background. This can be a white wall, poster board, or full backdrop.
For an absolute newbie on a budget, you can start with a white poster board – but make sure it’s not off-white or cream. If you’re using a white wall, make sure it’s smooth and without textures that will be impossible to edit out.
If you’re looking to invest in product photographs for your eCommerce store, any photoshop or marketplace like Amazon has a variety of white background options – with the most versatile being sweep plain white backgrounds that you can roll.
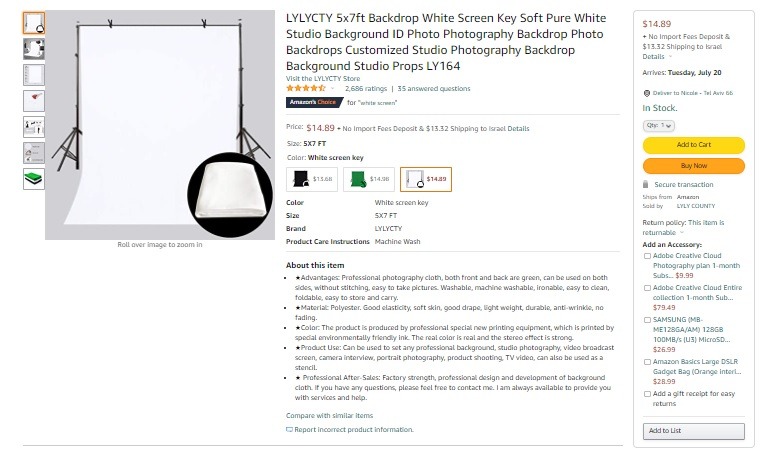
[Source: Amazon]
2. Light Box or Light Tent
Light boxes are see-through boxes that allow concentrated light through but soften any direct light. The advantage of this is it provides consistent lighting settings while eliminating the chance of too many shadows.
You can either get lightboxes that come with built-in lights, or if you have a bigger budget, you can get a softbox and add your own lighting (which is what we recommend).
The advantage of the latter is that most ready-made LED light boxes tend to be on the small side, which is limiting. They also give you much less control over your lighting.
Here are some of the most popular lightbox brands:
Alternatively, if you’re feeling crafty, you can make your own light box! Here’s how to build a great DIY lightbox for under $50:
3. Shooting Table
This can be a table, chair, stool, or any completely flat surface in your home that you can shoot on. If you are using natural light, ensure that you will be able to place your shooting table or stand near a window (light source).
4. Lights & Bulbs
Next, you will need clamp lights and bulbs. If you’re not using natural light (which we will discuss later), they will be your primary light source, and you will need three of them. We recommend 100-watt daylight bulbs for your clamp lights.
5. Tripod
You can shoot without a tripod, but if you want to make sure that you are keeping your photos consistent in terms of distance, lighting, and angles, we recommend investing in one. A good product photography tripod will have the following:
- Built-in spirit-level
- Orientation adjustability
- Height adjustability
- Stability
- Payload (your tripod can carry the weight of your camera and heaviest lens)
Some pro tripods include the Gitzo GT2541EX Series 2 and the Manfrotto 058B Triaut Camera Tripod.
6. Digital Camera or Smartphone
One of the most important pieces of equipment is your camera. If you have a smartphone with a great camera, there is no need to invest in a DSLR just yet. Here are some smartphones which have specs good enough to shoot with:
- Google Pixel & Pixel XL
- Apple iPhone 8 or higher
- Samsung Galaxy S8 or higher
- LG G6 or higher
In the long run, buying a DSLR is a good product photography investment.
7. Photo Editing Software
Lastly, you will need photo editing software to make those important photo tweaks after your shoot. There are plenty of free and paid photo editing software and online platforms out there. Choosing between them should be based on your budget, your comfort, your PC/Mac specs, and your photo needs. Some leading editing software and platforms include:
How to Shoot Products on a White Background
To DIY your white background photos, you should follow these six key steps.
- Pick your lighting
- Set up your background
- Place your products
- Set up your tripod
- Use the right digital camera settings
- Shoot your product photos the right way
Let’s dive deeper into each.
Step #1: Pick Your Lighting
The first and most important step is to pick your lighting. Getting your light right from the start means less time and effort at the editing stage. You have two light options when shooting your product photos: natural light or studio light.
1. Natural Light
Natural light is a good option if you have a smaller budget and aren’t using a lightbox.
In fact, there are plenty of professional photographers who prefer natural light over studio lighting where possible. But it does take some work and comes with a little more of a learning curve.
You will want to make sure that you have enough light but are not shooting in direct sunlight, as this will create shadows, which you don’t want.
The best way to shoot with natural light is by placing your shooting table near a large window that brings a lot of (indirect) light into a room. You can use white cloth or paper to cover the window to filter and soften the light. You also want to make sure you’re shooting at the brightest time of day.
2. Studio Lights
If you have a little more budget for your product photography, it is worth investing in good lighting and a soft lightbox, which we mentioned in the photography equipment section. With your soft lightbox, you will need two or three clip-on or clamp lights with strong bulbs.
You need a minimum of one light to act as your fill light (backlight) and one as your key light, which is placed in the front and to the side of your box. You will then need to play around with your light angles and distances until you have an even distribution of light and shadows.
Here’s a quick video guide on where to set up your clamp lights when using a lightbox or tent.
If you do opt for a lightbox with built-in light, here’s a guide to setting up your lights from the guys behind Foldio2 and Foldio3 – a popular light box product.
No matter what lighting solution you pick, you are aiming to ensure the top, sides, and product are all well-lit, and either all have the same shadow tone that you brighten up after, or have no shadow at all. The key here is light consistency throughout.
Step #2: Set Up Your Product Photography Background
Whether you’re using natural light and a white backdrop, a lightbox, or a tent, you should ensure that your background material or backdrop is set up with a sweep.
This ensures you have no sharp corners or blemishes behind your product.
In other words, you want to ensure that it doesn’t sit at a ninety-degree angle to the chair, box, or table, but is at a curve like this:

[Source: Fstoppers]
You can check out photographer Taylor Mathis’s Fstoppers case study showing how using a sweep improves the quality of your photos here.
Step #3: Set Up Your Product
Once your lighting and backdrop are in place, it’s time to place your product. Make sure that you put your product in the front of your background (before the sweep) and in the middle of your surface. You also want to make sure that you’ve placed it, or your lightbox, on a stable, flat surface.
Pro Tip: When shooting jewelry, you can use a fishing line to hang your pieces or glue dots to position rings upright.
Don’t forget the small details when placing your products. The tiniest adjustments can make or break a photo. For example, if you’re shooting a bottle with a label, you want to make sure that the label is 100% centered to the camera.
Step #4: Set Up Your Tripod
You’ve got your lights, your backdrop, and your product. Now it’s time to set up your tripod. The reason a camera or smartphone tripod is so important is that it ensures that you’re keeping a constant focus and depth. It’s much better to move the product slightly than to move the camera. Tripods also mean that your camera is stable enough to use the fastest shutter speeds possible, ensuring your whole product is focused well.
Step #5: Make Sure Your Camera Settings Are Right
The next step is to test your camera settings and get them just right. You will need to tweak this to ensure that you are taking the best photos possible. Here are our top camera setting tips:
- Image size: Select the biggest image size and file size options your camera or phone has. Ideally, you will want to shoot in RAW if your camera allows for it.
- Flash: Make sure your flash is off as you will be using either natural light or studio lighting,as outlined above.
- Lens: For those of you using DSLRs, you don’t want to use wide-angle lenses as this will distort your products.
- ISO: The higher the ISO, the brighter the product image will be. However, the higher the ISO number, the more distorted (noisy) your photo will be. If you’re using studio lighting, set your ISO to its lowest – 100.
- Quality: Set your image quality to its highest.
- Aperture Setting (A): F8-F11 will give you the best depth of field for product images. Too wide an aperture setting (F2.8 or 4.5) will mean not all of your product will be in focus.
- Shutter speed: The smaller the number, the brighter your photo will be. However, because this setting makes your digital camera sensitive to movement, you’ll need a tripod to avoid blurry images.
- White balance: If you’re a beginner, set your white balance to “automatic.” For more experienced camera uses using studio lighting, try setting your white balance to “flash”.
- Filters: Avoid using digital filters or camera light filters as this could distort the true colors of your product.
- Timer: To help eliminate the chance of product image blurriness, use the camera’s self-timer.
Step #6: Taking the Best eCommerce Product Images
Finally, you’re ready to take those awesome white background photos! Here are our top tips when shooting your product photos:
1. Take Test Shots
Before you go to town and get snappy-happy, take a test shot (or a few) before shooting each new product image. This ensures your camera settings, lighting, and product setup are perfect for easier editing.
It also allows you to more easily make the adjustments you need beforehand, saving you a lot of editing time.
2. Don’t Delete Images Until You’ve Seen Them on a Computer
While you’re shooting, don’t delete any images from your camera until you’ve seen them on your computer screen. A lot of the time, we can judge too quickly on the camera and delete awesome shots. By looking on a bigger screen, after the shoot, you will have a better idea of what images have the potential to be edited to greatness and which should be canned.
Pro Tip: Some digital cameras allow you to tether them to a computer, enabling you to see images on your big screen as you shoot. It’s called “shooting tethered.” Here’s a guide from DIY Photography to get you started: Introduction to Tethered Shooting.
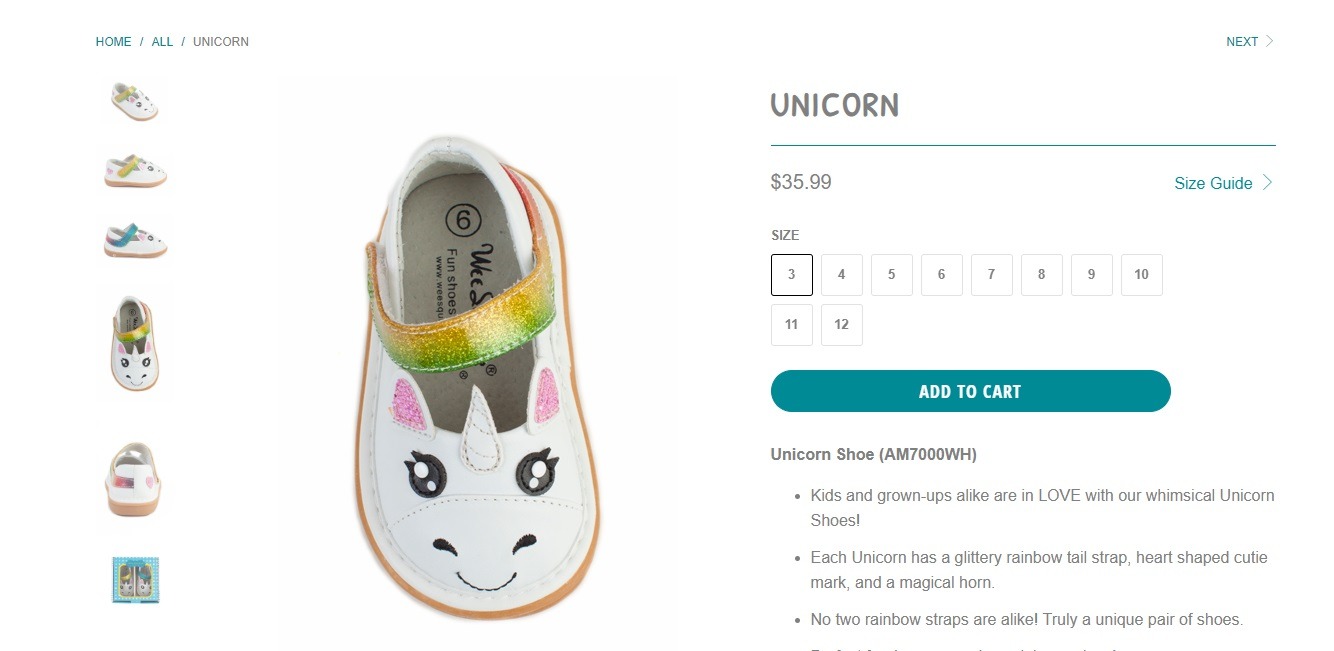
3. Take Plenty of Photos from Different Angles
While you’re shooting, take as many photos as you can from different product angles. Move the product around until you’ve shot every aspect to find its most attractive side.
Plus, having different perspectives on your website, like kids apparel store Wee Squeak, helps your customers see all sides of the product they want to buy.
4. Highlight Product Details
Your photos should highlight all the qualities of your product. People should be able to get a sense of the texture, design, shape, and scale. This could mean putting a coin in to show size or zooming in on certain textures or designs that make your product shine.
Remember, your photos are the only thing showing potential shoppers exactly what they are getting.
Pro Tip: Consider adding a product photo that includes more than one color option of your product to help your shopper choose their favorite.
5. Let Those Product Features Shine
Remember to show off your product’s most appealing features. If you’re selling a wallet or a purse, for example, you want to show a photo with it closed and of the inside of the product. Both are important features that people consider when buying a wallet.
Bonus Tip for Large Products
For those of you wanting to shoot larger products like tables or people wearing your apparel, it can be done. However, you are going to have to invest in larger backdrops and more substantial studio lighting. In principle, the concepts mentioned here will be similar, but it may take a little more time and brainpower to understand the tech side of things. Here’s a beginner’s guide to what’s involved in shooting bigger products.
How to Edit White Background Product Photography Like a Pro
When editing your photos for your marketing strategy or store, you want to make sure that they are bright (the exposure is good), the colors are bright but still true to your product, that unnecessary spots or dust are removed, that you’ve cropped (framed) your products well, and that your images are sized correctly for the platform you’re posting them to.
Here are steps to getting your product photo editing right.
Step #1: Remove Backdrop Edges
The first thing you want to focus on is backdrop removal. This means you crop the product image so that all the edges that show the end of your backdrop have been removed, leaving you with just the product and white background.
Step #2: Adjust Background Brightness
Once you have covered the backdrop removal, you will need to lighten your background so that it is bright and white instead of dull and grey.
Step #3: Retouch Those Spots
Now it’s time to delete spots. This means erasing any fibers or dust that are showing on your backdrop or products.
Step #4: Make Color Adjustments
Adjust the brightness, exposure, and saturation of your image to make sure the colors pop while ensuring that they still match the real thing as much as possible.
Step #5: Optional: Consider Adding a Shadow
Once your white background is edited and your products are shining, you can add a shadow to your product if need be.
Step #6: Removing or Editing Background Color
Once your product image is edited and perfect, you could then change the background color if you’re using different backgrounds for marketing banners like Mrs Bow Tie does, as shown below.
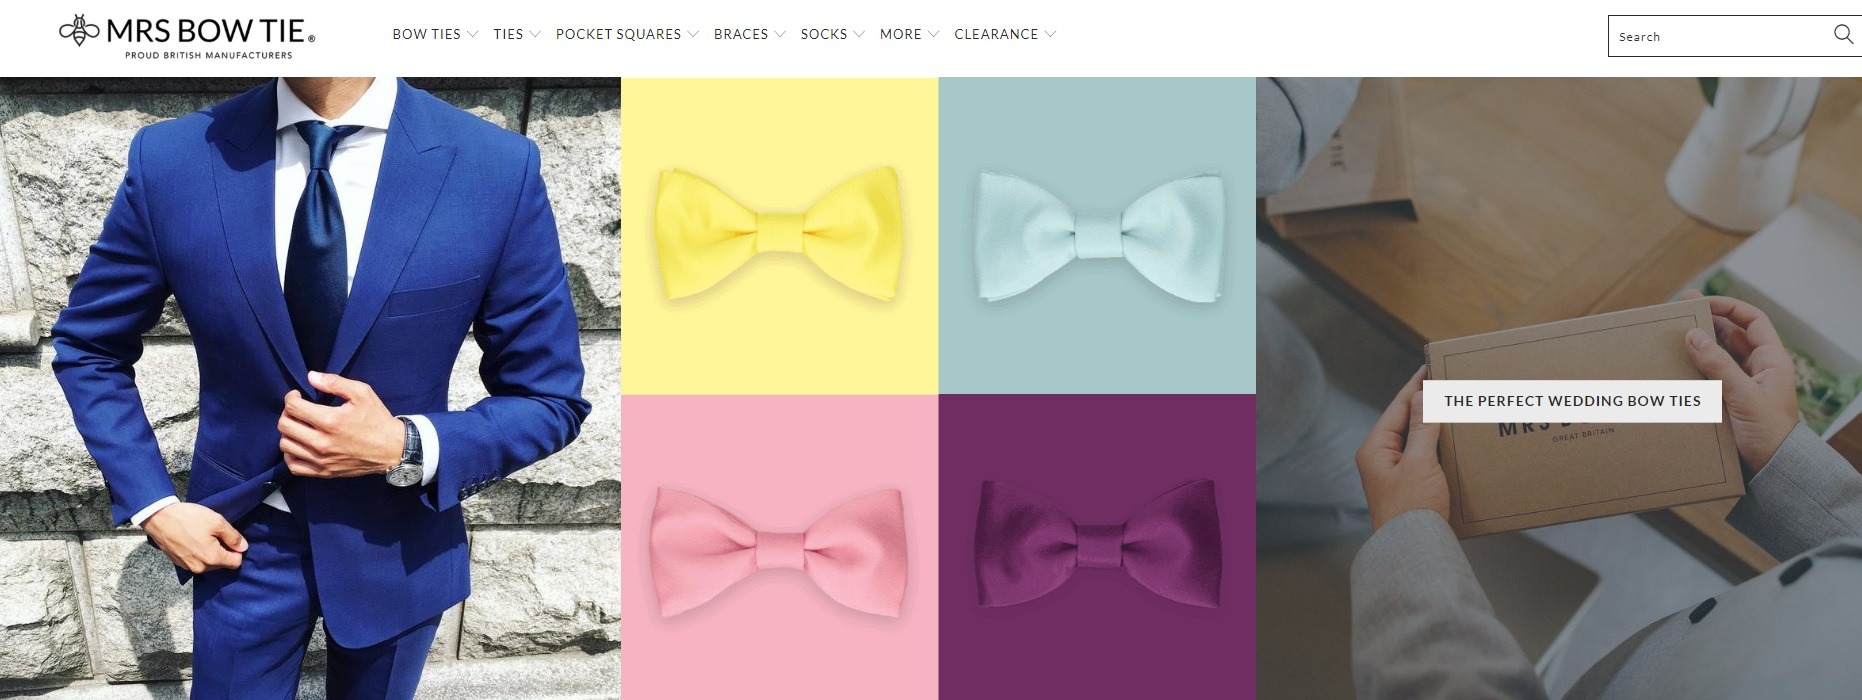
By shooting on a white backdrop perfectly and then editing your product images professionally, you will make changing to a colored background much easier. Colored backgrounds are great for social media marketing and landing pages.
Step #7: Saving and Resizing Images
You want to shoot and edit at the highest quality, and then resize your edited photo to the dimensions you need. Each platform, marketplace, or PPC campaign type has its own guidelines. So when you’re saving an image, save it within the ratio and size per platform.
For example, on Shopify, the accepted ratio is 1:1. Save time by saving all the formats at once when you’re finished with a product photo.
Bonus Content: Looking for more Shopify features? Visit our 7 Secret Shopify Features You Need to Know About post.
Step #8: Optimizing Your Photos for SEO
The final step is ensuring your images have been optimized for SEO. That means naming them correctly and compressing the final image so that it doesn’t affect your page load times. For more on how to optimize your online store with DIY SEO, check out these two guides:
Pro Tip: For those of you already familiar with Photoshop, here’s a great tutorial on editing product photographs on a white backdrop or background from Olivia Hayward.
Wrapping Up: DIY Product Photography on a White Background
There you have it – your full guide to product photography on a white background.
As your store grows and the number of products you offer increases, product photography can begin to feel like a full-time job.
In this case, we would suggest hiring outside freelancers or service providers to help you get new products online ASAP and scale up your product listings for Google Shopping and other eCommerce ads. Don’t forget your hero image – with main store CTAs – for your home page. [Check out these eCommerce call-to-action examples for inspiration]
Bonus Content: Looking to up your video game? Head over to our Global List of Video Production Services, Marketplaces and Platforms for eCommerce list. You will also want to check out our eCommerce TikTok Video Ideas and Video ad posts for tips on product videos and ads.
If you have product photography questions, feel free to post them in the comments below.
Happy shooting!
Pro eCommerce PPC and Social Media Marketing Tip: It’s time to automate your TikTok Ads, Facebook ads, Google Ads campaigns, and remarketing ads from one place! Traffic Booster is the only eCommerce-focused full PPC management software that will create, manage, and optimize your campaigns in real-time for peak performance. It is far more than just an alternative to WordStream, offering machine-learning campaign optimization and marketing expert assistance. You can find out more about choosing the right plan to suit your budget and business needs here.


Nicole is a content writer with over sixteen years experience and flair for storytelling. She runs on a healthy dose of caffeine and enthusiasm. When she's not researching the next content trend or creating business content strategies, she's an avid beachgoer, coffee shop junkie and hangs out on LinkedIn.
Recommended articles
 Facebook Ads for eCommerce: 16 Strategies, Examples & Tips
 How to Build a Winning eCommerce Ads Strategy
 Google Ads for eCommerce: Everything You Need to Know
 10X Your Traffic with PPC Management Software
Comments
Powered by Facebook Comments